Miner. Refiner. Manufacturer. She does not fight. Goal: Mine ore → reprocess into minerals → manufacture goods → haul to market → repeat. Combined active play earns 80–150M ISK/hr. Manufacturing jobs run passively while offline. Omega adds faster jobs, blueprint research, and the Viator — a cloaking hauler that makes dangerous routes risk-free.
New to EVE? Read this first
ISK is EVE’s in-game currency (K = thousands, M = millions, B = billions).
What Lady does: Industry — not combat. She mines ore, converts it to minerals, builds items from those minerals, and hauls the finished goods to market for profit. This loop generates ISK passively (jobs run while logged off) and actively (mining and hauling require you to be online).
Key concepts for industry:
- BPO (Blueprint Original): Bought once from NPC market stations (look for “Blueprint” in the item name, sold at stations in every region). Used unlimited times forever. More runs = more profit per ISK spent on the BPO.
- BPC (Blueprint Copy): A limited-use copy of a BPO. Lady doesn’t need these — she uses her own BPOs.
- ME (Material Efficiency): Research a BPO to ME10 via the Industry window → Research tab → Material Efficiency. This takes time but cuts mineral consumption by 10% permanently on every job — free profit forever.
- Manufacturing jobs: Open Industry window (Alt+S) → select a BPO → Manufacturing → confirm materials in hangar → set number of runs → Submit. Jobs run in the background even while logged off.
- Reprocessing: Converting ore into minerals. Always more profitable than selling raw ore. Done at any station with Reprocessing service — right-click ore stack → Reprocess.
Security space note: Lady stays in high-sec (0.5–1.0 security). No reason to go elsewhere — mining and manufacturing are safer and easier in high-sec, and courier contracts pay well for anyone willing to haul.
Where to buy: Check the Market window (Alt+R) at any major station. Jita 4-4 (The Forge) has the best prices for everything — set it as a starmap destination when buying BPOs or equipment.
| Activity | Hull cost | ISK/hr | Notes |
|---|---|---|---|
| Mining (Venture) | ~700K | 15–30M | Active — requires constant attention |
| Hauling courier contracts (Iteron) | ~2M | 50–100M | Active — high-volume routes |
| Manufacturing (4 jobs) | — | 50–200M | Semi-passive — runs while offline |
| Combined loop | — | 80–150M | Mine + manufacture + haul simultaneously |
Alpha vs Omega
| State | Activity | ISK/hr | Why it matters |
|---|---|---|---|
| Right now (Alpha) | Full combined loop | 80–150M | Mining + 4 mfg jobs + hauling |
| Omega — Manufacturing | Advanced Industry IV | +20% throughput | Same jobs, 20% faster cycle time |
| Omega — Research | Blueprint ME research | Cuts costs 10% | Free permanent profit on every item built |
| Omega — Viator | Dangerous hauling routes | 100–200M hauling alone | Low-sec/null-sec contracts pay 2–3× more |
| Omega — Full loop | All of the above combined | 150–300M | Compounding: better margins + faster jobs + higher-pay routes |
Lady’s Omega value compounds — researched blueprints cut costs permanently, the Viator opens high-pay routes, and Advanced Industry means more jobs in the same time.
Venture — Mining Ship
| **ISK/hr: 15–30M | Hull: ~700K | Total fit: ~13M** |
The dedicated mining frigate. Two mining lasers plus mining drones extract ore from asteroid belts. Income depends on ore type — Veldspar in high-sec is safe and steady; rarer ores pay more but appear in lower-security space.
Where to go: Any high-sec system’s asteroid belts — open the solar system map (click the sun icon) and you’ll see all belts listed. Right-click any belt → Warp To. Alternatively: Ore Anomalies appear in the Probe Scanner (Alt+P) and often contain better ore quality than regular belts.
Why mine: Ore you mine yourself costs nothing — the minerals from reprocessing it become free manufacturing materials. This is the foundation of the entire industry loop.
Best ore to mine: Check the regional market prices before heading out. Generally: Veldspar (Tritanium — needed for almost everything) is everywhere; Scordite (Tritanium + Pyerite) is common and slightly better; Pyroxeres (Mexallon + Nocxium) is worth significantly more where available. Mine whatever commands the highest sell price near your station.
[Venture, Mining]
Mining Laser II x2

1MN Afterburner I
Survey Scanner II
Medium Shield Extender I

Mining Laser Upgrade II x2

Small Core Defense Field Extender I x2
Small Anti-Thermal Screen Reinforcer I

Drones: Mining Drone I x2
| Module | Qty | ~Price |
|---|---|---|
| Mining Laser II | ×2 | 2M ea — 4M |
| 1MN Afterburner I | ×1 | 50K |
| Survey Scanner II | ×1 | 2M |
| Medium Shield Extender I | ×1 | 200K |
| Mining Laser Upgrade II | ×2 | 3M ea — 6M |
| Rigs ×3 | ~100K ea — 300K | |
| Mining Drone I | ×2 | 50K ea — 100K |
| Hull (Venture) | 700K | |
| Total | ~13M ISK |
✅ LD can make: Mining Drone I drones (cheap BPO), all three rigs, Survey Scanner I (T1 version — slightly worse, saves ~2M). T2 modules (Mining Laser II, Mining Laser Upgrade II) must be bought.
Session routine:
- Warp to an asteroid belt or mining anomaly
- Lock two large asteroids — run both lasers on the same rock until it empties, then move to the next
- Survey Scanner shows remaining ore volume in each rock — check before switching to avoid wasted cycles
- Launch Mining Drones, assign them to a rock — they add passive yield with no extra work
- When ore hold is full (~5,000 m³), warp to station, dump ore, return immediately
- If belt rats (NPC pirates) warp in and start shooting: warp out immediately — do not engage
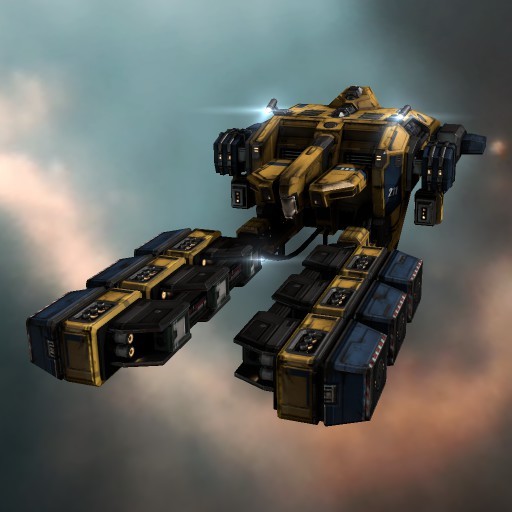
Iteron Mark V — Hauler
| **ISK/hr: 50–100M | Hull: ~2M** |
The largest T1 industrial ship. Hauls courier contracts between trade hubs for consistent ISK. Two fits below: safe routes (max cargo) and dangerous routes (harder to catch).
Where to go: Public courier contracts — open the Contracts window (Alt+O) → Courier → set Source to your current system or region. Look for contracts between major trade hubs (Jita → Amarr, Jita → Rens, Amarr → Dodixie, etc.) — these pay the most because of the distance and volume. Accept a contract, load the package into your cargo, fly the route, deliver at the destination station.
Why hauling pays well: Other players need goods moved but don’t want to log in and do it themselves. They pay you ISK as a fee. High-volume routes between major hubs pay 5–20M per contract. Running 5–10 contracts per hour reaches 50–100M/hr.
Safe routes — maximum cargo (use in high-sec only):
[Iteron Mark V, Max Cargo]
Expanded Cargohold II x5

Medium Cargohold Optimization I x3

Capacity: ~47,000 m³
| Module | Qty | ~Price |
|---|---|---|
| Expanded Cargohold II | ×5 | 1.5M ea — 7.5M |
| Medium Cargohold Optimization I rig | ×3 | 200K ea — 600K |
| Hull (Iteron Mark V) | 2M | |
| Total | ~10M ISK |
✅ LD can make: Iteron Mark V hull (BPO ~10M NPC — saves ~500K per hull once researched), Medium Cargohold Optimization I rigs. Expanded Cargohold II must be bought.
Risky routes — harder to catch (use when crossing through dangerous systems):
[Iteron Mark V, Survival]
Warp Core Stabilizer II x2
Medium Micro Jump Drive

Expanded Cargohold II x2
Nanofiber Internal Structure II x3

Medium Hyperspatial Velocity Optimizer I x2
Medium Cargohold Optimization I

Capacity: ~28,000 m³
| Module | Qty | ~Price |
|---|---|---|
| Warp Core Stabilizer II | ×2 | 3M ea — 6M |
| Medium Micro Jump Drive | ×1 | 5M |
| Expanded Cargohold II | ×2 | 1.5M ea — 3M |
| Nanofiber Internal Structure II | ×3 | 1M ea — 3M |
| Medium Hyperspatial Velocity Optimizer I rig | ×2 | 300K ea — 600K |
| Medium Cargohold Optimization I rig | ×1 | 200K |
| Hull (Iteron Mark V) | 2M | |
| Total | ~20M ISK |
✅ LD can make: Iteron Mark V hull (BPO ~10M NPC), both rig types. T2 modules (WCS II, Nano II, EC II) must be bought.
Two Warp Core Stabilizers mean most gankers cannot hold you — they need three tackle points and most carry one or two. Nanofibers cut align time so you warp out faster. Hyperspatial rigs increase warp speed between gates.
Hauling rules — always follow these:
- Never use autopilot. Autopilot lands you 15 km from gates at 75 m/s — a ganker’s dream. Warp gate-to-gate manually every single jump.
- Check the star map (F10 → enable Ship Kills layer) before each run. Avoid systems with many recent kills on your route.
- Uedama, Niarja, and Sivala are known high-sec ganking chokepoints — use the survival fit or reroute around them.
- Never haul more ISK in one load than you can afford to lose entirely.
Reprocessing
Why reprocess: Reprocessing ore into minerals gives 10–30% more ISK value than selling raw ore on the market. It costs nothing and takes seconds. Always reprocess before selling or using ore.
How: Dock at any station with Reprocessing service (check station info) → right-click your ore stack in cargo → Reprocess → confirm.
Reprocessing V (Lady has this) means minimal material waste. Player-owned Refineries (Athanors/Tataras) give even more minerals than NPC stations — ask in your corporation or in local chat if a nearby player refinery has public access.
| Mineral | Primary ore source | Used for |
|---|---|---|
| Tritanium | Veldspar | Base mineral — needed for almost everything |
| Pyerite | Scordite | Armour, structure |
| Mexallon | Pyroxeres, Kernite | Electronics, weapons |
| Isogen | Omber | Advanced T1 components |
| Nocxium | Pyroxeres | Advanced T1 items |
Manufacturing
ISK/hr: 50–200M (semi-passive) — Industry V + Mass Production III = 4 jobs running simultaneously, continuing while logged off.
How to start: Open Industry window (Alt+S) → click on a Blueprint in your hangar → Manufacturing tab → check that all materials are in your hangar → set number of Runs → Submit. The job runs in the background. Come back when it’s done to collect finished items.
What to build (check market margins before each run):
| Item | Margin | Why |
|---|---|---|
| T1 Ammo (Antimatter, EMP, Phased Plasma) | Low–medium | Fast to build, enormous volume, constant demand from PvP players |
| T1 Modules (Damage Controls, Shield Extenders) | Medium | Reliable, sold everywhere, easy to move |
| T1 Frigates (Rifter, Merlin, Atron) | Medium–high | Strong demand in war zones and from new players |
| T1 Destroyers (Thrasher, Catalyst) | Medium–high | Bulk demand from PvP fleets |
How to check margins: Open the Market (Alt+R) → find the item → look at the sell price → compare to the mineral cost shown in the Industry window. If sell price exceeds mineral cost by 15%+ after broker fees and taxes (~5%), it’s worth building. Margins shift daily — always check before submitting new jobs.
Manufacturing loop: Check margins → mine or buy minerals → submit 4 jobs → haul previous batch to market → collect completed jobs → repeat.
Daily Routine
- Collect finished manufacturing jobs from the Industry window → load Iteron Mark V
- Haul completed goods to nearest trade hub, list competitively (slightly undercut current lowest sell order)
- Submit 4 new manufacturing jobs immediately — keep all slots full at all times
- Switch to Venture — mine for the session, dump ore to station when full
- Reprocess the day’s ore haul into minerals
- Log out — manufacturing jobs keep running, ISK accumulates
Upgrade Path
Step 1 — Mining Drone Operation V + Jury Rigging III
Mining Drone Operation V: Unlocks Mining Drone II — significantly more ore per cycle on the Venture. Short train, immediate return.
Jury Rigging III: Allows fitting rigs on all ships. Improves both Venture yield and Iteron cargo capacity immediately.
Step 2 — Omega Subscription
Omega activates Advanced Industry IV (faster manufacturing cycle times), Laboratory Operation III (lets you research blueprints to cut material costs), and unlocks the Viator hauler prerequisite chain.
Manufacturing on Omega: Advanced Industry IV reduces manufacturing time by ~20% — same ISK, 20% more jobs in the same time.
Blueprint research on Omega: Use Industry window → Research tab → Material Efficiency. Research each BPO to ME10. Takes several hours per blueprint but cuts mineral consumption by 10% on every job, permanently. Free profit on every item built from that BPO forever.
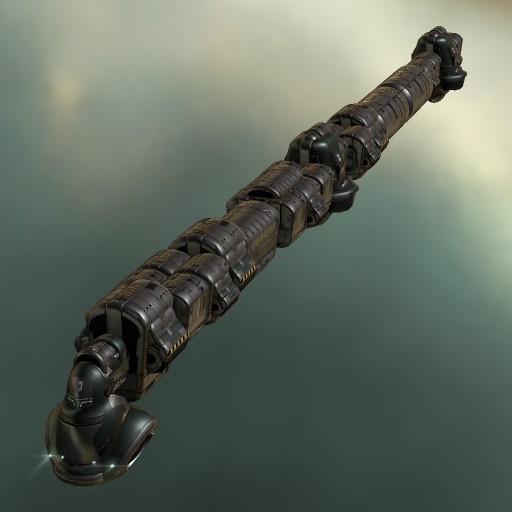
Viator — Goal Hauling Ship

| **ISK/hr: 100–200M | Hull: ~270M (T2 Blockade Runner) | Total fit: ~297M** |
A hauler that warps while cloaked — essentially immune to piracy. Run low-sec and null-sec courier contracts that pay 2–3× more than safe high-sec routes because most haulers won’t touch them.
Where to go: Contracts window (Alt+O) → Courier → filter by Route type including Low-sec or Null-sec. These pay significantly more per contract — 20–80M each — because of the perceived danger. With the Viator, that danger is near zero.
How to use the cloak: Undock → immediately press the Covert Ops Cloak hotkey (activate it from your modules bar). Warp to the next gate while cloaked. Jump through, immediately recloak on the other side. Gankers cannot lock a cloaked ship. The only risk is accidentally decloaking — Warp Core Stabilizers protect against that.
Requires: Gallente Industrial V + Cloaking I — both short trains after Omega activates.
[Viator, Blockade Runner]
Covert Ops Cloaking Device II

Warp Core Stabilizer II x2

Expanded Cargohold II x2
Nanofiber Internal Structure II x2

Medium Low Friction Nozzle Joints I x2
Medium Cargohold Optimization I
| Module | Qty | ~Price |
|---|---|---|
| Covert Ops Cloaking Device II | ×1 | 15M |
| Warp Core Stabilizer II | ×2 | 3M ea — 6M |
| Expanded Cargohold II | ×2 | 1.5M ea — 3M |
| Nanofiber Internal Structure II | ×2 | 1M ea — 2M |
| Medium Low Friction Nozzle Joints I rig | ×2 | 300K ea — 600K |
| Medium Cargohold Optimization I rig | ×1 | 200K |
| Hull (Viator — T2 Blockade Runner) | 270M | |
| Total | ~297M ISK |
T2 hull — no BPO. ✅ LD can make: all three rigs. Everything else must be bought. At 100–200M/hr, the ~297M investment pays back in 2–3 sessions.