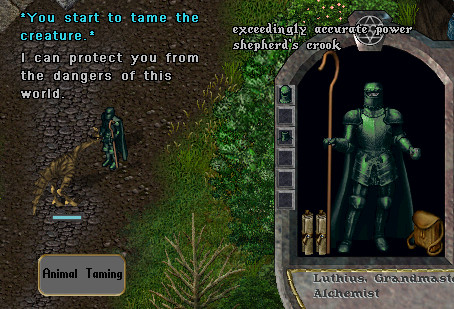
🐉 Animal Taming
Taming is the most powerful — and most time-demanding — playstyle in Outlands. Your pets are not just companions; they are weapons, tanks, and income generators.
The Taming Requirement
To tame a creature, you need Animal Taming skill above the creature’s taming requirement. Each creature shows its minimum taming skill in its tooltip. Attempting to tame a creature above your skill level will fail and occasionally anger the creature.
Raising Animal Taming: Animal Taming is notoriously slow to raise. The standard method:
- Start with horses, cats, and other easy creatures (taming req ~29)
- Progress to bears and similar (req ~60)
- Move to pack animals and rarer creatures (req ~80)
- Finally attempt high-end tames (req ~100+) with high skill
This process takes weeks of active play. Many players use a dedicated “macro” setup — keep the taming attempt going while nearby. The gains are slow but inevitable.
❤️ Bonding
Once tamed, a pet must be bonded before it achieves permanent status:
- Feed the pet daily for 7 real days
- After 7 days of feeding, the pet becomes bonded
- Bonded pets resurrect after dying — they become a ghost, and using Animal Lore on them retrieves them
- Unbonded pets are permanently lost on death
Never take an unbonded pet into dangerous content. The loss of a tamed Greater Dragon before bonding is one of the most devastating setbacks a new tamer faces.
Control Slots
Every pet uses control slots. Your available slots scale with Taming skill:
| Taming Skill | Control Slots |
|---|---|
| 29–79 | 3 slots |
| 80–99 | 4 slots |
| 100+ | 5 slots |
| 120 (Power Scroll) | 6 slots |
Keeping pets that fit your slot budget is essential. A 100-taming character can control one Greater Dragon (4 slots) plus one small pet, or two White Wyrms (4 slots combined), etc.
🏆 Pet Tier List (2026)
S-Tier — End-game pets:
| Pet | Slots | Requirement | Why |
|---|---|---|---|
| Greater Dragon | 4 | 100+ | Highest DPS and HP of any tameable pet; the apex |
| Hiryu | 3 | 105+ (Power Scroll) | Extremely fast attacks, high DPS |
| Reptalon | 3 | 108+ | Strong all-rounder, cold resist |
A-Tier — Excellent pets:
| Pet | Slots | Requirement | Why |
|---|---|---|---|
| Cu Sidhe | 2 | 100+ | Rideable; heals itself; strong combat; extremely popular |
| White Wyrm | 4 | 95+ | Magic abilities; high HP; dragon without the DPS |
| Nightmare | 3 | 95.1+ | Rideable; fire breath; fast; excellent all-purpose |
B-Tier — Solid choices:
| Pet | Slots | Requirement | Why |
|---|---|---|---|
| Rune Beetle | 2 | 98+ | Applies Corpse Skin (removes resists); exceptional support pet |
| Fire Steed | 2 | 95+ | Rideable; fire breath; good budget option |
| Ki-Rin | 3 | 90+ | Magic; decent HP; beautiful |
| Unicorn | 2 | 80+ | Rideable; heals; charming |
C-Tier — Good for training:
| Pet | Slots | Requirement | Why |
|---|---|---|---|
| Ridgeback | 1 | 83.1 | Rideable; cheap slot investment |
| Horses / Various | 1 | 29 | Basic mount; raise taming skill |
Pet Combat Commands
Set all of these as macros — typing mid-combat is too slow.
| Say / Macro | Effect |
|---|---|
All follow me | All controlled pets follow you |
All kill | All pets attack your current target |
All stop | All pets stop current action |
All guard me | Pets enter defensive mode; attack anything that attacks you |
All come | Pets return to your position |
All stay | Pets hold current position |
[pet name] kill | Named pet attacks your target |
[pet name] follow me | Named pet follows; others maintain orders |
Veterinary & Animal Lore
Animal Lore: Double-click a pet to see its current stats — HP, damage, resists, and status. Higher Animal Lore = more detailed information shown. Also directly boosts the effectiveness of Veterinary.
Veterinary: Use bandages on your pet (drag bandage to pet, or macro “Use bandage → target last pet”). Heals the pet over time. Works exactly like Healing for players. Higher Vet + higher Animal Lore = better, faster heals.
A GM Tamer with GM Vet and GM Animal Lore, healing a bonded Greater Dragon, can sustain that pet through almost any solo PvE encounter in the game.
🔨 Crafting
Every item a player uses — every sword, every suit of armour, every potion — was made by another player. There are no “best in slot” drops that make crafting obsolete. The best gear in the game is crafted, by players who’ve mastered their trade.
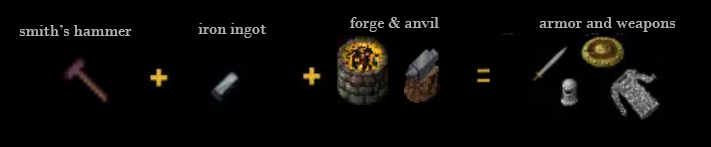
🔩 Blacksmithing
Blacksmiths create the metal weapons and armour that every warrior, paladin, and many other templates rely on.
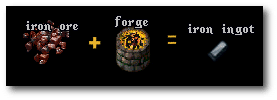
The Blacksmithy Loop:
- Mine ore from mountains and cave walls with a Pickaxe
- Smelt ore at a Forge (in town or player-placed) to create ingots
- Use ingots at a Forge to craft weapons and armour
- Arms Lore improves Exceptional chance
Ore Types (ascending rarity and quality):
| Ore | Ingot Name | Armour Bonus |
|---|---|---|
| Iron | Iron Ingot | Base physical resist |
| Dull Copper | Dull Copper Ingot | +Stamina regen |
| Shadow Iron | Shadow Iron Ingot | +Energy resist |
| Copper | Copper Ingot | +Cold resist |
| Bronze | Bronze Ingot | +Fire resist |
| Gold (Ore) | Gold Ingot | +Physical resist |
| Agapite | Agapite Ingot | Balanced elemental resists |
| Verite | Verite Ingot | High elemental resists |
| Valorite | Valorite Ingot | Maximum resists; the pinnacle of crafted metal |
Higher-tier ore is rarer and found deeper in mountains and caves. Mining skill affects the chance of finding coloured ore — a GM Miner with a Prospector’s Tool can significantly increase coloured ore yields.
Exceptional Quality: When crafting exceeds a skill check threshold, items become Exceptional — bearing your crafter’s name and providing a significant bonus to all stats. A GM Blacksmith crafting from Valorite with Arms Lore creates gear that rivals or surpasses most dungeon drops. These items are worth serious gold.
Runic Tools: High-end content occasionally drops Runic Hammers — tools that, when used to craft, add random magical properties to the item (bonus attributes, elemental damage, special effects). Runic-crafted items can be among the best in the game. These hammers are valuable enough to sell for significant gold even without using them.
🧵 Tailoring
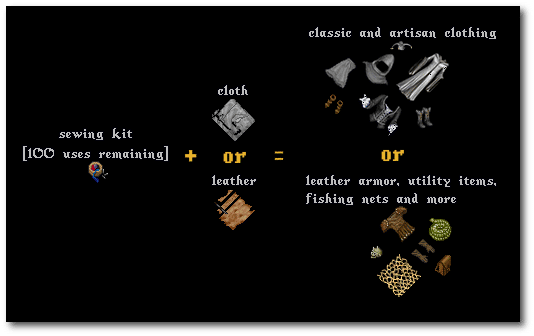
Tailors create leather and cloth armour — the preferred defence for mages, archers, tamers, and any template relying on unimpeded mana regeneration.
The Tailoring Loop:
- Kill animals and use a Butcher’s Knife or Skinning Knife on their corpses to obtain hides
- Use hides at a Sewing Kit to craft leather armour
- Buy cloth from NPC vendors to craft cloth items and bandages
Leather Grades:
| Leather | Source | Quality |
|---|---|---|
| Regular Leather | Common animals (deer, bulls, sheep) | Base armour; easy to find |
| Spined Leather | Spiders and some monsters | Better energy resist |
| Horned Leather | More powerful creatures | Better fire resist |
| Barbed Leather | High-tier creatures | Maximum resist; the pinnacle of leather craft |
Barbed leather armour crafted by a GM Tailor is the definitive armour for mages and archers. The creatures that drop Barbed hides are dangerous — this leather is expensive because it costs effort to obtain.
⚗️ Alchemy
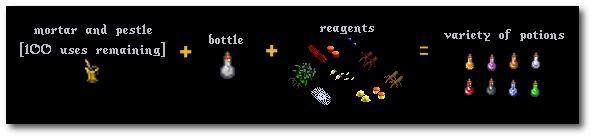
Alchemists create potions. Every active player consumes potions constantly — the demand never stops.
The Alchemy Loop:
- Gather reagents (most come from harvesting or NPC shops)
- Use a Mortar and Pestle at an Alchemy station to craft
- Potions stack in your pack up to a certain quantity
Essential Potions:
| Potion | Effect | PvP Importance |
|---|---|---|
| Healing Potion | Instant heal | Critical — always carry |
| Greater Healing Potion | Larger instant heal | The one you actually use in crisis |
| Cure Potion | Instantly cures poison | Essential |
| Greater Cure | Stronger cure; handles more severe poison | Better option |
| Refresh Potion | Restores stamina | Important for sustained combat |
| Total Refresh | Full stamina restore | Key PvP tool |
| Explosion Potion | Thrown item; delayed AOE fire damage | Game-changing in PvP |
| Conflagration Potion | Thrown; fire field at location | Area denial |
| Parasitic Potion | Causes bleeding on target | DoT tool |
| Strength Potion | Temporary STR boost | Situational combat boost |
| Agility Potion | Temporary DEX boost | Increases swing speed and bandage speed |
Alchemy’s value is in quantity. A dedicated alchemist who maintains stock and prices competitively will always have gold coming in.
📝 Inscription
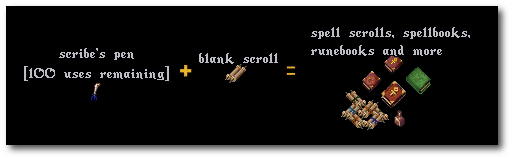
Inscription allows mages to scribe spell scrolls and provides a unique combat bonus.
The Inscription Bonus: A mage carrying a spellbook and having Inscription skill receives a Spell Damage Increase (SDI) bonus up to 10% — making every offensive spell hit harder. This is passive and always active for mages with Inscription trained.
Scrolls: Inscribed scrolls are single-use versions of spells. Tamers use Recall scrolls to teleport. Warriors carry Invis scrolls for escape. Mages scribe high-level spells for allies who can’t cast them. The scroll market is steady.
Carpentry, Tinkering (Bowcraft is inactive in Outlands)
Carpentry: Creates furniture (for housing), wooden shields, staves, and quarterstaff weapons. Crafted furniture for housing is a steady income source for dedicated carpenters.
Bowcraft (inactive in Outlands — bows crafted by Tinkering): Creates bows, crossbows, and ammunition. Archers consume arrows and bolts constantly — this is a high-volume, steady-income craft.
| Ammunition | Bow Type | Notes |
|---|---|---|
| Regular Arrows | Bows | Standard |
| Crossbow Bolts | Crossbows | Heavier; higher damage |
| Magical Arrows | Bows | Special arrows with elemental damage |
Tinkering: One of the most utility-focused crafts.
- Lockpicks — consumed by rogues unlocking chests; constant demand
- Traps — applied to containers; damages thieves who try to snoop
- Tools — Pickaxes for miners, Sewing Kits for tailors, Mortars for alchemists
- Jewelry — Rings and bracelets that can have magical properties
- Clockwork — Mechanical constructs used in some crafting recipes
⛏️ Resources & Gathering
Mining
Required: Pickaxe, Mining skill, nearby mountain or cave wall
Mining is the resource base for the entire metal economy. Every sword and suit of armour starts as ore in a mountain.
Training Mining: Mine iron ore repeatedly. Skill gains come from successful mining. Early skill comes from NPC mining trainers.
Prospector’s Tool: At higher Mining skill, a Prospector’s Tool can be used on a mountain face to increase the chance of finding coloured ore. The difference in output between an unmined mountain face and a prospected one is significant for high-tier ores.
Gargoyle’s Pickaxe: A magical pickaxe (found as loot) that reveals the type of ore in a vein before you mine it. Extremely valuable — allows targeted mining for specific ore types.
Mining Locations:
- Mountains around Minoc — iron-rich, some coloured ore
- Northern mountain ranges — more isolated but productive
- Cave systems inside dungeons — dangerous but can yield high-tier ores
- Note: Mining inside dangerous areas carries full PvP risk
Lumberjacking
Required: Axe, Lumberjacking skill, nearby trees
Lumberjacking harvests Logs from trees. Logs are used by Carpenters and Bowcrafters. Unlike mining, Lumberjacking also provides a passive combat bonus: any character with Lumberjacking skill deals bonus damage with axes, scaling with skill level.
At GM Lumberjacking (100), the damage bonus with axes is significant — enough to affect template design decisions.
🎣 Fishing
Fishing is a gathering skill that most new players overlook. It provides:
- Fish — used in cooking; food buffs
- Treasure Maps — some fishing spots yield maps
- Special Fish — rare fish with unique properties
- Nets — can be used to find underwater treasure caches
- SOS Bottles — messages in bottles that lead to underwater treasure
Training Fishing: Fish from any body of water. Skill gains come naturally from fishing attempts.
Fishing as an income source: Consistent fishing in productive spots can yield steady gold from selling rare fish, cooking products, and occasional treasure finds. It’s a relaxing playstyle that still contributes to the economy.
💰 Ways to Make Gold
![]()
💀 Monster Hunting (PvM)
The foundation of most players’ income. Kill creatures, loot their gold and items, sell to vendors or other players.
Beginner Areas (0–1 months):
| Location | Creatures | Gold/Hour Est. |
|---|---|---|
| Britain Cemetery | Zombies, skeletons, ghouls | 5,000–10,000 |
| Spirituality Dungeon | Mixed undead, low-tier creatures | 8,000–15,000 |
| Yew Cemetery | Skeletons, liches (easy side) | 10,000–20,000 |
| Compassion Dungeon | Easy creatures, good for beginners | 8,000–18,000 |
Mid-Tier Areas (1–3 months):
| Location | Creatures | Gold/Hour Est. |
|---|---|---|
| Despise Dungeon | Ogres, trolls, ettins | 20,000–40,000 |
| Covetous Dungeon | Harpies, various | 25,000–50,000 |
| Shame Dungeon | Elementals | 30,000–60,000 |
| Deceit Dungeon | Undead, liches | 25,000–50,000 |
High-Tier Areas (3+ months, strong gear):
| Location | Creatures | Gold/Hour Est. |
|---|---|---|
| Destard Dungeon | Dragons, drakes | 60,000–150,000 |
| Fire Dungeon | Fire creatures | 50,000–100,000 |
| Hythloth | Demons | 50,000–100,000 |
| Doom Dungeon | Endgame creatures | 100,000–300,000+ |
| Twisted Weald | Fey creatures, unique drops | 80,000–200,000 |
| Underworld | Ancient horrors | 80,000–250,000 |
🗺️ Treasure Hunting
Treasure Maps drop from monsters. Decode them with Cartography, locate the spot on the map, dig with a shovel, and fight the guardians that spawn.
Map Tier Progression:
| Level | Difficulty | Reward Range |
|---|---|---|
| 1 (Plainly Drawn) | Easy | 5,000–15,000 gold + minor items |
| 2 (Expertly Drawn) | Easy-Moderate | 10,000–30,000 gold |
| 3 (Adeptly Drawn) | Moderate | 20,000–60,000 gold |
| 4 (Cleverly Drawn) | Hard | 40,000–100,000 gold |
| 5 (Deviously Drawn) | Very Hard | 80,000–200,000 gold |
| 6 (Diabolically Drawn) | Extreme | 150,000–500,000+ gold + rare items |
Required: Cartography (to decode), Shovel (from tinkers), combat ability to handle guardians. T5–T6 maps require serious combat power or a tamer.
Crafting & Selling
A GM crafter with access to high-tier materials can generate consistent, reliable gold.
Most profitable craft sales (2026):
| Item | Market Rate | Notes |
|---|---|---|
| Exceptional Valorite Plate Set | 200,000–500,000 gold | Best metal armour in game |
| Exceptional Barbed Leather Set | 150,000–400,000 gold | Best leather armour in game |
| Runic Hammer-crafted weapons | 100,000–1,000,000+ gold | Highly variable on properties |
| Explosion Potions (stack) | 1,000–3,000 each | PvP consumable; constant demand |
| Greater Healing Potions | 500–1,500 each | Constant demand |
| Lockpicks (stack) | 500–1,500 per 10 | Rogues consume constantly |
| Arrows (bundle) | 1,000–3,000 per 100 | Archers always need more |
Pro tip: Check the Auction House and Britain Bank vendors before crafting. Market prices shift. Craft what’s selling, not what’s easiest.
🎵 Bard Farming
Provoke powerful monsters onto each other. Watch them fight. Loot the winner’s victim.
Classic Bard Circuit:
- Enter Destard Dungeon (dragons)
- Provoke Dragon A → Dragon B
- Position safely; watch them fight
- One dies; loot its body
- Wait for the survivor to calm; provoke it against a third
- Repeat
A skilled bard can farm Destard solo with virtually no combat risk. The gold and loot from dragon corpses add up quickly.
Income: 50,000–120,000 gold/hour for a skilled bard in optimal locations
🐲 Tamer Farming
The strongest sustained PvM income at endgame. A Greater Dragon tamer in Doom Dungeon is the benchmark for maximum PvM income.
Income ladder:
- Tamer with Nightmare/Cu Sidhe in mid-tier dungeon: 50,000–100,000/hour
- Tamer with Greater Dragon in Destard: 100,000–200,000/hour
- Tamer with Greater Dragon in Doom: 200,000–500,000/hour (rare drops elevate this)
👑 Champion Spawns
Champion Spawns are large-scale PvE events — a pulsing Altar appears in a dedicated area, and killing creatures around it builds “levels” through multiple waves, culminating in a Champion Boss that is far more powerful than standard creatures.
Reward structure:
- Power Scrolls — the primary prize; allow skills above 100. Worth 200,000–2,000,000+ gold depending on scroll and skill
- Gold — significant
- Rare drops — champion-specific loot
- Fame and Karma — substantial reputation gains
Champion Spawn Locations: Multiple dedicated areas around Avadon. Check the Outlands wiki for current active locations.
Warning: Champion Spawns attract other players. PvP over spawns is common — the Power Scrolls are worth fighting for.
🛒 Player Vending
Place vendors at your house (requires a house with vendor slots). Stock them with crafted goods, potions, or rare items. Collect gold passively.
Setting up a vendor:
- Own a house with available vendor slots
- Hire a Vendor from an NPC shop
- Place the Vendor in your house
- Open the Vendor, add items with prices
- The Vendor sells items and holds your gold for collection
Best vendor stock:
- Crafted consumables (potions, arrows, bandages)
- Crafted armour sets (leather, plate)
- Resources (ingots, leather, wood)
- Rare items from dungeon runs
🏛️ The Auction House & Player Economy
The Outlands Auction House is the primary secondary market for rare, valuable, and hard-to-price items.
Using the Auction House
Access the Auction House via the dedicated NPC in Britain or through the Outlands web interface.
As a seller:
- Place an item with a starting bid and optional buyout price
- Set auction duration (1–7 days typically)
- Receive gold when the auction ends
As a buyer:
- Browse active auctions by category
- Bid incrementally or use buyout
- Item delivered to your bank on win
Reading the Market
Before crafting or farming, check:
- What’s currently listed — if 15 players are selling the same thing, prices are depressed
- Recent sold prices — the Auction House shows historical sales
- Britain Bank vendors — player vendor prices in the main hub
The Economy’s Structure
Avadon’s economy has clear tiers:
High demand, always selling:
- Healing and cure potions
- Explosion potions
- Arrows and bolts
- Bandages (in bulk)
- Common crafting materials (iron ingots, regular leather)
High value, irregular demand:
- Power Scrolls (especially 115 and 120)
- Exceptional Valorite/Barbed armour sets
- Runic-crafted weapons with good properties
- Rare creature drops with unique abilities
Seasonal/Event Items:
- Event-exclusive cosmetics and items
- Limited availability; prices vary wildly
🗺️ Dungeons & Exploration

The World of Avadon
Avadon’s custom map has multiple cities connected by wilderness full of creatures, ruins, and secrets. The wilderness is not safe — monsters roam everywhere, and other players can attack you in most areas.
Major Cities:
| City | Theme | Notable Feature |
|---|---|---|
| Prevalia | Capital / Magic | The Bazaar (main market); Arcane Alley (best mage shops); Society Hall; primary bank and social hub |
| Andaria | Military / Cold | Northern kingdom; Mage’s Guild; exceptional stonework; cold climate and strong fighting tradition |
| Cambria | Warrior / Desert | Desert warrior city; Fighter’s and Warrior’s Guilds; partially flooded from the Inferno eruption |
| Corpse Creek | Outlaw / Black Market | Lawless bandit haven; best black market; mercenaries and criminals; no law enforcement |
| Horseshoe Bay | Coastal / Trade | Natural harbour; fishing and maritime trade; important waypoint for sea traders |
| Anchor’s Rest | Southern Port | Southern sea access; sailors and fishing community |
| Outpost | Frontier | Northernmost safe settlement; satellite of Andaria |
| Terran | Crossroads | Inland settlement connecting the major kingdoms |
Major Dungeons — Complete Guide
All dungeon names are unique to UO Outlands. There are no retail UO dungeons (Destard, Covetous, etc.) in Avadon.
Prevalia Sewers (Beginner) Type: Sanctuary dungeon — safe from PvP Creatures: Rats, slimes, sewer vermin, low-level humanoids Recommended: New characters with 40–60 skill Notes: The easiest content outside Shelter Island. Good for getting your first feel for dungeon combat without the threat of player killers.
Ratman Hovel (Beginner) Type: Sanctuary dungeon — safe from PvP Creatures: Ratmen, small beasts Recommended: Early characters building their first template Notes: Another safe starter dungeon. Use these sanctuary dungeons to establish your character before venturing into the open PvP world.
Urukton Bluffs (Beginner–Easy) Type: Sanctuary dungeon — safe from PvP Creatures: Orcs, goblins, primitive humanoids Recommended: Characters with 50–70 skill Notes: The final safe dungeon before you graduate to the open world. Good loot for early characters.
Cavernam (Easy–Medium) Location: Far northern region Creatures: Ice Liches, White Wyrms, Wendigos, Rime Spirits, Winter Wolves, Glacial Creeps, Frozen Furies Recommended: 80+ weapon or magic skill; cold resist helps significantly Notable drops: Cavernam Rares; frost-themed magic items Notes: A frozen glacier dungeon with multiple levels and a boss room. The ice-themed creatures deal cold damage — a character with solid cold resistance will have a much easier time. The White Wyrms in the deeper levels are the main threat.
Darkmire Temple (Easy–Medium) Location: Deep swamp, southern region Creatures: Arachnai (Hivematron, Ravager, Soldier), Spirit Bears and Wolves, Bear and Wolf Druids, Swamp Dragons, Swamp Drakes, Giant Black Widows, Poison Dart Frogs Boss: The Terrorwood Recommended: 80+ skill; poison resist; bring poison cure potions Notable drops: Darkmire Rares; nature-themed drops Notes: Swamp environment with a heavy druidic theme. Poison is the main hazard — stock cure potions before entering. The Arachnai come in multiple variants; the Soldier types are the most dangerous.
Kraul Hive (Medium) Location: Central wilderness Creatures: Giant insectoids in multiple variants (Corrosive, Foulglow, Siltsifter, Spelltouched), giant spiders, the Kraul Hivemother Boss: Kraul Hivemother, Kraul Hydra Recommended: Established character; 90+ skill recommended Notable drops: Kraul Rares; insect chitin drops Notes: A massive insect hive with 69+ creature types. The Kraul are organised — expect coordinated attacks from multiple creature variants. The Hivemother boss fight requires preparation. Poison and acid damage are common.
Aegis Keep (Medium) Location: Northern region Creatures: Blood Dragons, Blood Daemons, Blood Elementals, Blood Golems, Bloodwolves, Cultists, Chaos Knights, Liches, Rage Daemons, Twilight Guardians Recommended: Solid build; 90+ skill; energy and fire resist Notable drops: Aegis Keep Rares; blood-themed magic items Notes: A former blood cult fortress now consumed by what the cult summoned. Multiple levels plus boss rooms. The blood creatures deal mixed damage types — diversify your resistances. The Chaos Knights and Twilight Guardians are the highest threats outside boss rooms.
Mount Petram (Medium–Hard) Location: Underground mountain cavern Creatures: Terathaners (Goliath, Warriors, Drones, Matrons, Broodguards, Larvae), gem Elementals (Amber, Amethyst, Diamond, Emerald, Ruby, Sapphire), Trapdoor Spiders, Earth Drakes, Minotaurs, Harpies, Moss Giants Boss: Terathan Goliath Recommended: 95+ skill; a tamer with a strong pet thrives here Notable drops: Mount Petram Rares; gem drops; crystalline loot Notes: The Terathaners are intelligent and fight in formation. The gem elementals are slow but hit hard. The Terathan Goliath in the deepest chamber is one of the more demanding non-endgame bosses in the game.
Ossuary (Medium–Hard) Location: Desert ruins west of Cambria Creatures: Skeletal Dragons, Skeletal Mages, Liches, Mummies, Revenants, Necromancers, Ossuarian Warriors, Desert Scorpions Boss: The Forgotten King Recommended: 95+ skill; Chivalry or undead-damage spells are strong here Notable drops: Ossuary Rares; undead-themed drops; desert materials Notes: A desert tomb dungeon with strong undead theming. Chivalry players are extremely effective — holy damage doubles against undead. The Forgotten King boss room requires you to fight through layers of his undead court before reaching him.
Inferno (Hard) Location: Volcanic region near Cambria Creatures: Fire Beetles, Fire Crawlers, Firebats, Lava Elementals, Infernal Archers, Infernal Knights, Infernal Mages, Infernal Sorcerers Bosses: Infernus, Heart of the Mountain Recommended: 95+ skill; high fire resist is mandatory; cold-damage weapons are a significant advantage Notable drops: Inferno Rares; fire-element drops; volcanic materials Notes: Build maximum fire resistance before entering — fire damage is constant and severe. Ranged combat and cold damage spells are ideal here. The Heart of the Mountain boss is a deeply embedded encounter in the lowest chamber. The volcano eruption in 607 AC that flooded Cambria originated from this dungeon.
Nusero (Hard) Location: Nusero Island — accessible by boat, entrance on north side Creatures: Azure Wyrms, Ember Dragons, Emperor Dragons, Pit Dragons, Smoke Drakes, Eldritch Drakes, Ophidian Warriors, Ophidian Mages, Ophidian Shamans, Forktongue Battlebanes, Ghostly Dragonknights Recommended: Endgame-capable character; GM Tamer with Greater Dragon is the benchmark Notable drops: Nusero Rares; dragon hides; high-value island drops Notes: Island access requires a boat or magic travel. The dragons and wyrms in deeper levels are comparable in difficulty to the hardest mainland dungeons. Ophidian groups use flanking tactics — be prepared to be surrounded. The ghostly remnants of dragonknights tell you exactly how hard this place is.
Pulma (Hard) Location: Dam between Prevalia and Andaria regions Creatures: Deep Crawlers, Drowned Daemons, Water Dragons, Sea Hags, Precursor Engineers, Guardians, Lancers, Sentries, Maelstrom Bosses: Maelstrom, Ancient Drowned Dragon Recommended: High-end character; the dam aqueducts require you to navigate water sections Notable drops: Pulma Rares; aquatic drops Notes: Three dungeon levels accessed via long aqueducts. The Ancient Drowned Dragon chamber at the bottom is a true endgame encounter — it predates the dam itself and whatever it originally was, it has been down there long enough to evolve into something unique.
Tidal Tomb (Hard) Location: Underwater — Wildlands region Creatures: Drowned Buccaneers, Drowned Mariners, Zoa variants, Crabs, Frenzyfins, Tidal Kraits, Tidal Sea Serpents Recommended: High-end character; prepare for oxygen management Notable drops: Tidal Tomb Rares; aquatic and maritime drops; +5% gold and XP in underwater sections Notes: Unique mechanic — the deeper levels are fully submerged. Oxygen depletes over time, dealing unpreventable damage. Recovery Dolphins are stationed at key points and refill your oxygen — find them. The reward for pushing deeper is +5% gold and experience per level. Do not go deep without knowing where the dolphins are.
Shadowspire Cathedral (Hard–Endgame) Location: Desolate region, accessible overland Creatures: Spectral Warriors, Knights, Priests, Bishops, Crimson and Iron Gargoyles, Mephits (Fire, Frost, Earth, Poison, Blood), Gargans (Flamekin, Flameshaper), Marble Minotaurs, Horned Devils Recommended: Endgame character; full resist profile required; PvP risk is high here Notable drops: Shadowspire Cathedral Rares; spectral and demonic drops Notes: One of the largest dungeons in the game. The interior contains themed rooms including recreations of places lost to Avadon’s history. This dungeon is heavily contested by PvP — other players are a constant threat. High energy, fire, and physical resists are needed. Expect company.
Mausoleum (Endgame) Location: Remote location Creatures: Unknown — the full creature list is not documented. The Gatekeeper guards the entrance. Boss: The Gatekeeper Recommended: Endgame only; the inscription warns even the virtuous to prepare Notable drops: Mausoleum Rares Notes: Little is publicly known about the Mausoleum’s interior. It has been there longer than any recorded history. The warning above the entrance is taken seriously by experienced players.
Forsaken Keep (Endgame — Subterranean) Type: Subterranean dungeon Recommended: Endgame characters only Notes: One of two subterranean dungeons accessible via underground routes. High-level content with commensurate rewards.
Undermountain (Endgame — Subterranean) Type: Subterranean dungeon Recommended: Endgame characters only Notes: The deepest accessible dungeon in Avadon. Undermountain is where the hardest content and the best loot converge.
Time Dungeon (True Endgame) Recommended: The most geared, most skilled characters in the game Notes: The final endgame dungeon. Details are intentionally kept sparse — part of its mystique is that you must earn the right to know what is inside.
🗝️ Dungeon Maps — The Instanced System

Outlands adds a unique layer on top of standard dungeon content: Dungeon Maps that create private instanced encounters.
How Dungeon Maps Work
- Obtain a Dungeon Map — they drop from creatures inside the relevant dungeon
- Use the map at the dungeon entrance — this consumes the map and creates your instance
- Enter the instanced dungeon section — a private version with guaranteed spawns
- Fight through rooms — each room is harder than the last, with escalating rewards
- Collect rewards and exit
Why Dungeon Maps Matter
Standard dungeons have shared spawn areas — you compete with other players for kills. Dungeon Maps give you a private room with guaranteed creatures and no competition. For farms that require specific creature kills, this is enormously valuable.
Dungeon Map Tiers
Maps drop at different quality levels corresponding to dungeon difficulty. Higher-tier maps have tougher rooms but better rewards. Some of the rarest and most valuable items in the game drop exclusively from high-tier dungeon map completions.
👑 Champion Spawns

Champion Spawns are the closest thing Outlands has to raid content. They are not instanced — anyone can join, and PvP over them is common.
How a Champion Spawn Works
- Locate an active Altar — found in designated areas. An active altar radiates a distinctive visual effect
- Kill creatures in the vicinity — this builds the Altar’s power level through multiple “waves”
- Wave progression — each wave brings harder creatures. There are typically 4–6 waves
- The Champion spawns — a powerful boss creature appears when the altar reaches maximum power
- Kill the Champion — it drops Power Scrolls, gold, and unique loot
Wave Creatures
Each champion spawn has a specific creature theme — undead, elemental, dragon-type, etc. The wave creatures become progressively more dangerous, requiring better gear or more players to handle efficiently.
The Power Scroll Economy
Power Scrolls are the primary economic driver of champion spawns:
| Scroll Type | Approximate Value |
|---|---|
| +5 (skill to 105) | 50,000–150,000 gold |
| +10 (skill to 110) | 100,000–400,000 gold |
| +15 (skill to 115) | 300,000–800,000 gold |
| +20 (skill to 120) | 500,000–2,000,000+ gold |
The most valuable skill scrolls (Taming, Magery, Combat skills) command premium prices. A single 120 Animal Taming scroll can be worth millions.
Defending Your Spawn
Champion Spawns attract competition. PvP guilds often patrol spawn areas looking for groups to attack — especially when the Champion is about to die. Common approaches:
- Run with a guild — safety in numbers
- Scout the area before committing
- Have an escape plan — keep a Recall scroll ready at all times
- Know the terrain — use dungeon layout to funnel and control attackers